 New toggle clasps ready to glaze.

New glazed toggle clasps fresh from the kiln.


 This extraordinary lady is going to be the photo for a new section in my newsletter I am calling Let Us Now Praise Famous Beaders. And indeed let us praise the children of the Elmwood Village Charter School who created her. She is clearly a beader in her own right with a fabulous necklace in white. Unlike James Agee, I will be focusing on beaders both known and unknown with the purpose of exploring some of my favorite artists and finding new ones. Check out my newsletter by signing up for it here or on my website. I ususally send it out the last Sunday of the month.
 For the last quite a few years, we haven't had a garden because the deer have eaten it up. The final straw was the year they took a bite out of all of my tomatoes. That was it. In the meantime, I have been using a very tiny garden that we annexed onto the chicken yard. It has a very high fence and has never been bothered by much of anything. The only problem is that it can only grow a few things since it is so small.

This last photo shows how much the peas in the first photo have grown already.


 Here is the set up we used. We are using a hothead and mapp gas. This is a good choice for beginners to get a sense of how beads are made. All the really well known bead makers use a combination of propane and oxygen which is faster and hotter. But we did well if we could make a bead in this slower, cooler mode. I came away from this experience with even more awe for the contemporary glass bead makers. In fact, I can't even imagine how they get all the detail they do into the beads that they make. Also, being a ceramic bead maker, I felt as if I could not control what I was doing at first since I am used to having the clay in my hands and having quite a bit of control over its shape. But you had better not reach out and touch that hot glass bead!!
Kim demonstrates making a glass bead. She holds the rod up at right angles to the bead. She makes a disk shape and them rounds it out. This makes a nice dimple in the center of the bead.

 before. I have never seen a Spring like this before in the North Country.

 I have always hated to knit. I was taught as a child and just found it to be very frustrating. And in fact Isis has tried to teach me in the past and I still hated it. But not too long ago our little artist group that makes up Isis Saturdays wanted to knit so I joined in. I had heard about and seen a one hour hat project that looked doable before I would become too frustrated. It was big yarn and big needles. In fact I had given my daughter-in-law needles and yarn for the project at Christmas. So we all agreed to try the hat since none of us are knitters. I had a lot of yarn around the house from when I was making bead crochet bracelets so I took some of that and some size 13 needles I had around for making large holes in beads for a macrame wall hanging project several years ago. I had a good attitude I thought when we got there and Isis was a magical teacher. This time I seemed to get it, a bit. I knitted and purled and so on until my arms ached ( I had very long needles and my knitting was a bit too tight.) We had a great lunch from all the wonderful dishes each of us brought.


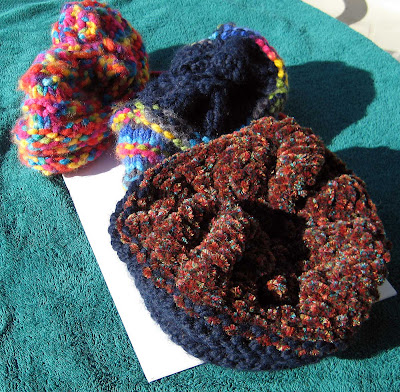 My three hats. From left to right beginner hat--- to the one I like the best.
Many thanks to Isis our magical teacher.

 Luckily the second Saturday of my Ceramic Bead Making class turned out to be beautiful and sunny since we were outside glazing beads and raku firing them.
 Here is a bird's eye view of the kiln of their fired bisque ware ready for glazing. I did slip some of mine in here too somewhere.
We all sat around two tables up in front of the entrance to my studio. This seems to be a great spot since there is electricity and we have quick access to my studio in case we need something.

Sally Hartman stopped by and made some oak leaves and fired a couple of beads. She makes lovely smoke fired earrings out of these leaves.

Here is a bead rack after the beads were quenched in cold water and the straw and sawdust rinsed off. You can see that there are some beauties there.

These are some of the raku beads (many went unphotographed since I was so busy I forgot to do it sooner) after they have been scrubbed with Ajax and dried. They are being photographed in the late late afternoon sun. I pulled the last load of beads out of the kiln about 6:00 PM. We had started at 12 Noon. Wow are those colors great!! Everyone made great beads. What a wonderful day we had. I am so glad that we did this!!


 Heather's lovely brown beads and my Clover pendant and raku beads.
 Here I have wire wrapped the Humblebeads with copper wire and copper flowers. I love the way the copper contrasts with my large round bead's shades of green and brown. The brass colored chain seems to pick up colors in both of our beads.
 Here Heather's lovely disk beads and long tubes pick up the colors in my Thistle pendant. The dark green fiber chain complements her beads well. See what I mean about delicious colors!!


These are pictures of from the ceramic bead making class I taught last Saturday. These are shots from Day One. Students are working in low fire white ceramic clay so that they will get good, bright results when they glaze their beads and pendant. We made beads, pendants, toggle clasps, and links with high temp wire.


 We kept our ready to dry work in little plastic trays or these ridged plates. They will go out into the entrance way to my studio which has shelves. It is a bit drier there than in my studio which is below ground level a bit and very moist-- a good and bad quality.

 Students very concentrated on their work. All made beautiful pieces. It is such a pleasure to be around such creative folks. Thank you for coming.
 The Flower
 Our multicolored layered beads were a favorite. We learned the basic skills first on making the round beads.
 The picture above shows a student rolling the what will become the flower. She is applying pressure to the bumpy bubble wrap which has been tied around a foam tube to give the fibers the necessary agitation and pressure to felt.