Wednesday, July 18, 2007

Potsdam Summer Festival


It was a miracle that it didn't rain, since that is all it has done here in the last 2 weeks, it seems. But traditionally, this wonderful, joyous festival held downtown at Ives Park in the college town of Potsdam, New York, does have sunny weather. Here is my booth which I shared with Isis Melhado. Her beautiful rag rugs are featured in this picture on the corners of the two tables.


This is my third year in a row of selling at the Potsdam Festival and I am always so validated by the very receptive and appreciative visitors to my booth. Potsdam is a very special place with so many people who love the arts. I thank one and all who stopped at my booth this year and enjoyed and appreciated my artwork. I make ceramic and fused glass pendants and free form peyote stitch necklaces using my handmade ceramic beads. The strung neclaces I make are also mostly made from my handmade beads. I love it that there are so many people in this area that like my chunky unusual jewelry.


Saturday, July 07, 2007

Colorful Beads Pendants and Buttons By BOC Artists

I recently checked out the Beads of Clay photos on Flickr! and was excited to see so much color. It always amazes me that ceramic bead artists can create such tiny colorful wonders with clay. I want to devote this post to some of these amazing, brightly colored beads, buttons and pendants. You can click on any of the pictures to find out more about the artist and see their Flickr! portfolio.


Red and White
Originally uploaded by marlasmud


This is a great and colorful pendant by Marlasmud. Really exciting colors.


Originally uploaded by annieo2006


Gorgeous flower bead
by annieo2006


Flaming Heart Bead
Originally uploaded by Earthenwood Beads


These colors are truly flaming hot. A wonderfully playful bead by Melanie at Earthewood.


Gorgeous pinks by Joan Tucker at offcenterproductions.com


spotted fish
Originally uploaded by rusmar31


Wild and full of fantasy, this fish button by rusmar31


These jackets are so different, colorful and fun.
They are by embroideredsoul


Salsa bead bracelet
Originally uploaded by LadyBrook


Brightly painted salsa beads by LadyBrook


Colors and unique shapes from Natalie Gillihan


Ladybug Leaf Pendant
Originally uploaded by Shaterra Clay


Beautiful color combinations so skillfully achieved from
shaterra clay


Great red and silver combo by Lisa Peters Art.


long bead
Originally uploaded by MillerPorcelain


Incredible color and skill from Joan Miller of MillerPorcelain


JoelleBday
Originally uploaded by gaeac


Gaea's beautiful Day of the Dead necklace from gaeac


paz
Originally uploaded by Dilán


Exciting colors from Dilan


Tile Pendant
Originally uploaded by la_v_i_k_a


Great yellows in a cool format by vika


New Tie Dye Buttons
Originally uploaded by claybuttons


These incredible Tie Dye buttons are from Claybuttons. Hard to imagine how she did this. Cool.


A cameo in an incredible color by Yolanda Miramontes


Cameo Pendant
Originally uploaded by yoli miramontes


I guess I didn't want to leave myself out. A multicolored pendant with several stringing holes for added decoration by MaryHarding of MaryHardingJewelry.


These great colors are achieved by skillful use of glazes. My all time favorite for lowfire earthenware clay is Mayco Stroke and Coat. These glazes come in a wide selection of colors and are very reliable. If you want really bright colors you need to put on three coats. I often don't use such bright colors and with one or two coats you get more of a watercolor effect with Stroke and Coat. I have recently seen that Duncan has come out with some very bright Neon Colors. I expect to have the purple and light green in the kiln by tonight. Duncan also makes a line of colors like Stroke and Coat but I haven't tried them.
For high fire clays like porcelain and stoneware Spectrum and Georgie's make good glazes. But that is not an area that I know much about. A good subject for another blog post.

Sunday, June 17, 2007

Future Ceramic Bead and Pendant Makers


Not too long ago, I was invited to teach elementary aged students how to make ceramic beads and pendants. My host was Nan Lazovik, who is the Elementary School Art Teacher at Edwards Knox Central School and a fine ceramic artist in her own right. She makes wonderful tile landscapes and narratives drawn from her own life.
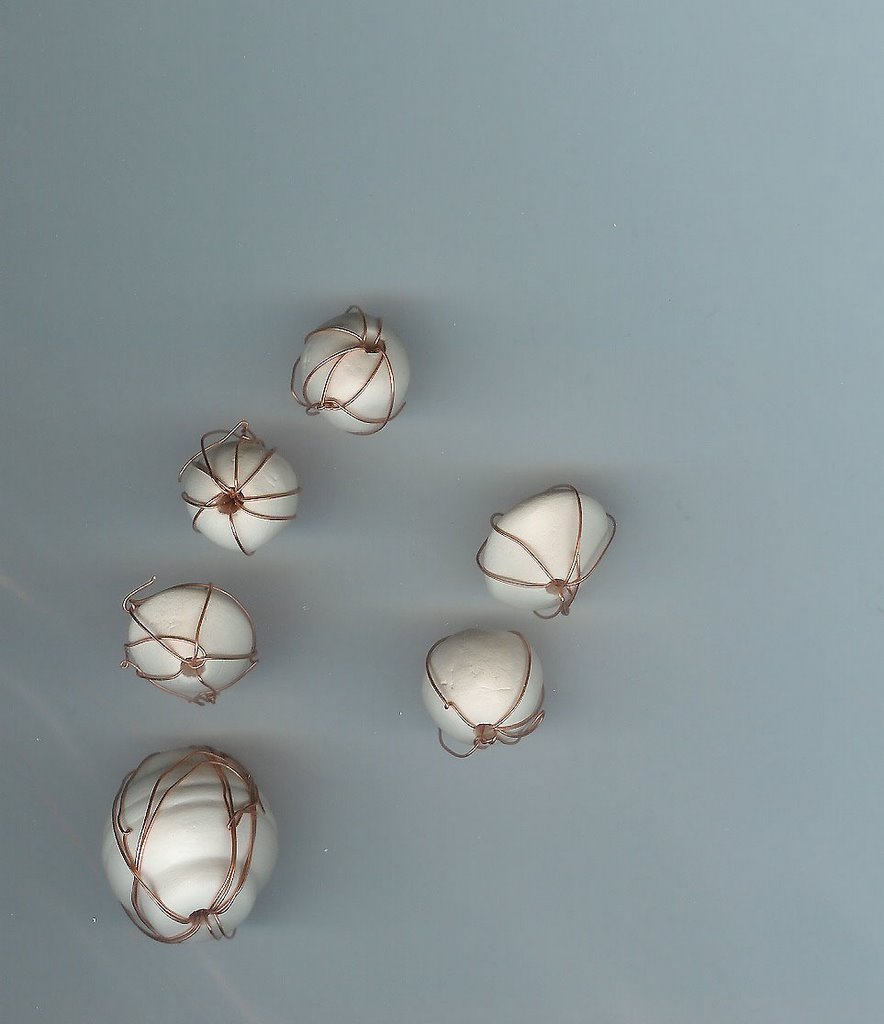
This project got underway, thanks to our local arts council director Hillary Oak. (www.slcartscouncil.org). She has teamed up with BOCES (Board of Cooperative Educational Services) to fund the project. Each year a brochure is printed and all the art teachers in this county can choose to invite one of the visiting artists listed. I felt very honored that Nan invited me, since she is such an accomplished ceramicist. But she felt I had something special to offer due to my long time involvement in making ceramic beads. Since one of her classes was studying Egyptian Art, I brought along some Egyptian Paste Clay (Amaco) in the same Turquoise color that much Egyptian Faience is made in so the lesson fit in well with their academic studies. Here is a picture of the Egyptian Paste Beads coming out of the kiln.


Other students who were in the First and Second Grade made beads and the Fifth and Sixth Graders made beads and pendants. Here is a photo of some leather hard pendants made by the older students.


and here is a close up of one.


I thought the way she shaped the clay to put in the hole was quite sophisticated, and actually not a way I had suggested. I found all of the students to be very creative and ingenious.

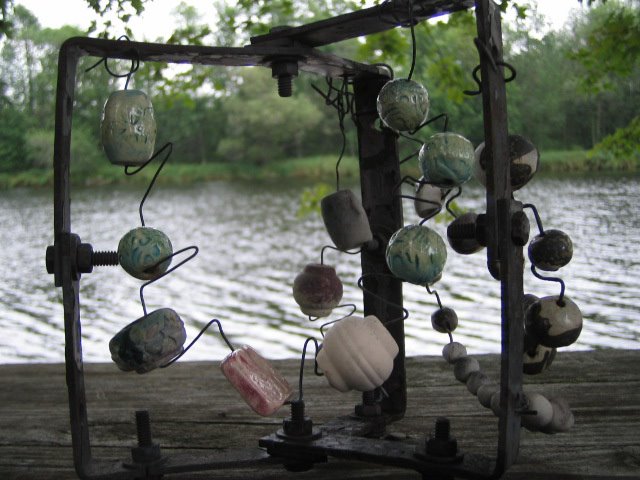
All of the children really loved my display of ceramic beads and peyote stitch necklaces and bracelets. They loved feeling the beads, and they were entranced by the colors. Here is a photo of some of the 2nd graders looking at the beads:


As part of my presentation, I made a small kit up for each child which consisted of some foam core strips and a plastic tube for rolling the clay. The children were pleased to be able to take these home with them after the class. The school, of course, provided lots of clay, and the classroom is equipped with a very nice and large Skutt kiln.

As one of the classes of younger children was lining up to leave, one of the students said to me.

" I want to do what you do when I grow up."

And another child piped up and said:

" I want to be you when I grow up."

I think that these children will remember making beads and pendants and I feel they are so lucky to live at a time and in a culture that encourages such artistic endeavors. Thank you Nan Lazovik and thank you Hilary Oak and BOCES.
And a very special thank you to the students of Edwards-Knox Central School who were so welcoming to me and enthusiastic about making ceramic beads and pendants.

Monday, June 11, 2007

Bead Journal Project


I was fortunate to get in before the dealine on this exciting project undertaken by bead artist Robin Atkins. I have commited to making a beaded journal page each month for one year. There are 239 other people involved--all women and 1 man--who have agreed to this same regime. The purpose of the project is to expand creativity and to grow as an artist. I decided to do the project because I was interested in the discipline of making a monthly page and the opportunity to be more intuitive and improvisational. The focus is on process not product--an idea I really like. I also joined the project because of my respect for and affinity with Robin Atkins. I especially like her website and her wisdom. So here I am into the Bead Journal Project. I have decided to feature at least one of my handmade ceramic beads on each page and have begun with a square raku bead that I really like. So far it is going well. I chose a moleskin burgundy fabric that I have fused to a light weight pelon and that seems to be working. My page size is 4 1/4 x 6 inches. So far I am really enjoying the process and I am working on two peyote stitch necklaces with my ceramic beads, simultaneously. Here is a photo of my progress so far.
You can read about The Bead Journal Project at http://beadjournalproject.blogspot.com

Sunday, May 13, 2007

Ceramic Bead Making Raku Part III A Closer Look at the Beads

This is Part III of my Raku Bead Making Series in which I take a closer look at the beads I created in the Firing on Part II of the video.

Thursday, May 10, 2007

Saturday, May 05, 2007

More Raku Excitement

Recently I purchased a 20 jar sample pack from Georgie's of premixed raku glazes. These are ideal for a beadmaker as it could take a very long time to use them all us. I am also hoping to find some exciting colors. Well, I tried two of them out on May Day. One came out great, called Copper Penny. It is an incredible antique deep jade green sometimes and many iridescent colors other times. I will post the pics of the pieces below. Since I am only firing to 1700 degrees F. the other color I tried did not come out. But I am sure there are more in the box that will work.


Also related to Raku, I have posted a 3 part video series on YouTube of me making raku beads in my small Paragon SC3 kiln. I have been inspired by Tonya Davidson of Whole Lotta Whimsy and Sue Ki Wilcox. I have added a few of my own ideas. This film is in a funky, very direct style to get the info across. I am still new to video editing so there are a few errors but the info is good and useful to anyone who wants to see one way of doing it. I also tried experimenting this week will letting the beads touch even if they are glazed. This is a much faster way of stringing the beads on the wire but I had a lot of casualites and think I will go back to the safer method of separating them with a crimp in the wire.

Saturday, April 14, 2007

Art Bead Scene

I have recently discovered the wonderful blog called Art Bead Scene. This is put on by a number of talented art bead makers, including some of my favorite Beads-of-Clay artists Melanie Brooks Lukacs of Earthenwood Studio; Tari Sasser, Creative Impressions in Clay; Elaine Ray, Elaine Ray Beads; and Virginia Miskas, Fired Clay Artists on a daily basis. They have excellent articles and I look forward to reading them each day. For April they are having a contest with a great set of art beads for a prize. The theme is Taking Flight. I have it in my mind I want to enter so that I have a chance to win those fabulous beads. Well, I tried several ideas using some of my art beads and they didn't come out right. Jewelry designing doesn't come easily to me most of the time, but I persevere and sometimes I am so lucky. Well, while I was doing the Raku bead firing on Wednesday, it came to me--that is-- a title for a necklace I would make: The Flight of the Fire. I was so excited about the way the fire had marked the terra cotta beads that I made a necklace from them this morning and have entered it in the Art Bead Scene contest. Here is the photo of my entry:


This contest is open to anyone who makes jewelry with artists beads. Check out their blog at http://www.artbeadscene.blogspot.com/ I think you will love it.

Raku Beads


I am very excited that I finally got a chance to Raku fire some beads that have been waiting since late fall for the weather to be warm enough for me to fire them outdoors. On Wednesday, squeezed in between a week of rain and snow and another bad weather week coming up, I was able to do a firing. And make a video of it. This was the first time that I have used a terra cotta clay for a Raku firing so I was a bit apprehensive about how they would turn out. But all went well and I am so pleased with the results.

Friday, March 16, 2007

Ceramic Shards

I have been inspired by an opportunity to join the Beadmakers Blog Ring to expand the focus of my blog. So I changed my name from pitfired beads to maryhardingjewelry bead blog. This will give me a place to talk about all kinds of ceramic bead making. I am excited about this but also a bit nervous as very few people ever read my blog before.

I have been experimenting with making ceramic shards for my peyote stitch necklaces. I got the idea from Linda Musante who uses PMC to make shards for her peyote stitch. I have made and glazed two so far and have 5 more in the greenware stage. I am excited about the sculptural effect of these shards. They are not flat. I have formed them around a bottle shape to give them a bit of a curve and it seems just right. But so far I have not added one to a necklace. I think I will wait until the next batch is ready.
I found out yesterday when I was sponging off some rough edges of my ceramic shards, that I was making more shards as I went along as they kept breaking. Because they are slightly concave they seem to break more easily than a flat pendant. So now I have a few more shards than I started out with.

As I was working on the shards I was thinking about pottery shards that I found as a kid in Arizona and how they all had smooth soft edges as well. I would smooth mine out anyway, as they need to be comfortable and gentle on clothing and the necklace itself, but I was wondering at first if a shard should be smooth. Funny how answers pop into our heads.

But one thing about today and yesterday that will not remind me of my childhood in Arizona is the new deep snow. We had just had a great melt and now it is back again. Beautiful, but I was already thinking Spring. One good thing though, I can have one more chance to use my cross country skis. I had been regretting that I had missed the last day before the thaw.

Sunday, January 14, 2007

More Jewelry

This necklace is composed of smoke and sawdust fired beads from a number of different firings. It is simple but the shades of gray and black are complex and create a piece of jewelry that I never tire of. I am always finding new details in the beads and new colors in the blacks and grays. The silver spacers bring the colors alive.

Wednesday, March 01, 2006

The Jewelry


I don't think that I really fell in love with pit firing until I strung my first bracelet with pit fired beads from that original firing and saw how lovely the grays and blacks looked with silver spacers and findings. Once that first bracelet was strung together, those beads took on a new life that continues to charm and inspire me. I am pleased to say that that very first pit fired bead bracelet belongs now to a good friend of mine who truly loves it as well. I don't think I could have parted with it otherwise. I have since made more but that first one stands out in my mind as a sentinel and a peak experience in my journey of making clay beads.

Friday, February 24, 2006

How They Turned Out


The picture on the right is how the beads that were wrapped with thin copper wire turned out. They have faint shadows of lines and some nice shades of orange brown. The buffalo has faint lines radiating from the center hole where I strung the wire. There is also a small crack in the bead near the hole and I think that the wire put a lot of stress on the center hole and I would be more careful next time. On some of the other beads the wire dug into the clay as well. But I do like the faint hint of lines. They give the beads another dimension.
When I set up this firing, I spritzed some of the smaller beads with water and then tossed copper carbonate powder at them and it stuck to them. I think it helped with the color. That photo is coming up next.
This firing was done with coarse saw dust. To top off the can I threw in about 5 banana peels. I had heard that they help with the color. I do believe that these small beads that had the copper carbonate on them are blacker than any others I have fired. They have a real raku look to them. Seems this firing was very good on setting up a reduction atmosphere. I think that the small black beads will look really great strung with silver findings and spacers.
It seems that I like nights when the wind is howling to post my blog. Tonight there is yet again another attempt up here in the North Country to have some more winter. Makes me want to do another firing. But I am out of bisqued beads. The ones I had set aside for a saw dust firing, I have in the kiln right now in a porcelain slow glaze. I have just begun to experiment with porcelain and am beginning to like it. At first, the viscous shiny surface put me off, and the way my stains didn't come out the way they do at low fire really upset me. But I do love that silky feel.
The small beads in the photo above were wired to a metal rack which is the invention of Sue Wilcox. This one has withstood quite a few firings and doesn't seem to be falling apart yet. It is made with angle irons. It is the same rack that is on the first entry in this blog. The point I am trying to get to is that the little beads were affixed to this rack whereas the larger beads that had the thin copper wire in them were placed at the top of the can and worked their way down with the fire. The small ones were only in the fire when it reached them but seemed to have been more affected by the reduction atmosphere than the larger beads. I don't know why this is. Perhaps it was the bananas!
Well Winter, keep on howling, because for me that is the best weather for beading and late night blogging.

Tuesday, January 31, 2006

The Ice


Overnight the rain fell and turned to ice that glazed the trees, the roads, and our long driveway making it hard to walk up to the sawdust firing. But the fire kept going through out the storm and didn't stop until about 8PM tonight. For 29 hours the firing barrel smoked and slowly burned through the sawdust. I can't wait to see how the beads came out. It was still too warm to open the can tonight. I will look tmorrow.
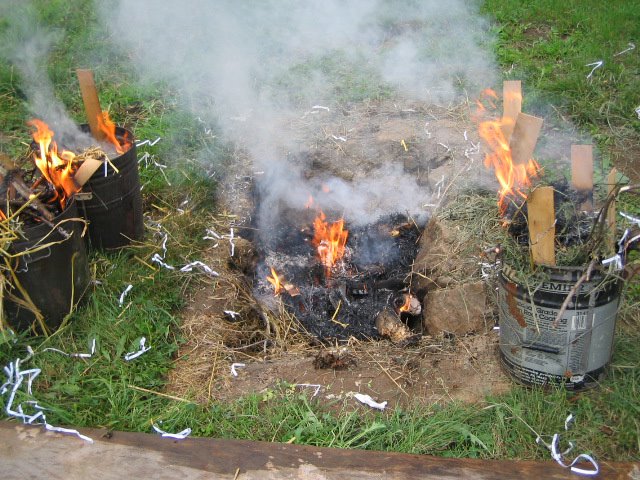
It amazes me that the fire kept going through the heavier rain, wind and ice. At one point I was sure that it had gone out as the can felt cold. But then I caught a red glint from one of the air holes and smelled smoke and knew it was still alive. This picture was taken at about 11AM the next morning and the fire was still going strong.
A Sawdust Fired Pendant Vessel
This pendant vessel came out of a sawdust firing done on January 8, 2006. Again the weather was cold but there was no rain or snow falling. I had used very fine and dry sawdust and the fire burned out much more quickly. It was started at about 4PM but was completely burned out by the morning. This pendant has a glazed stripe down the front and back, has been previously pit fired, and was painted with a coat of copper carbonate before it was put in the the barrel. I think it came out very well and I love the pinkish aura around the stripe.

Sunday, January 29, 2006

The Fire


Here is the can in which the saw dust firings have been done this month. The white ball on the top is a porcelain bead that will work its way down the burning material and be a surprise for me when I empty out the can when it cools off. The white on the ground is snow. It was a very cold day when this can was fired but it did well anyway. This particular firing took place on January 8, 2006 and was composed of fine, very dry sawdust. The fire was begun in the late afternoon and was completely burned down by morning.


Bead Preparation


Today, at about 3:00 PM I began to light the fire for a new sawdust firing. It is a cold day, despite being warm for January. It is about 24F and a winter weather advisory is calling for freezing rain. Luckily, I got the firing started before the rain, and now that everything is getting a gloss coat of ice, the beads are toasty warm and the fire is smoking away.
Today I used a number of small porcelain beads that had been bisqued at cone 06. They were strung on rebar wire and hooked to the framework I use which just fits into the sawdust firing chamber which is a large can with some holes drilled into it. I spritzed the beads with water and then tossed some copper carbonate powder on them, hoping that the water would hold the powder closer and longer to the beads and have an affect on their color. We shall see. In addition, I strung some larger porcelain bisque beads with 28 guage copper wire which I strung in the central hole. This is supposed to affect the color as well. I am now going to upload a photo of those beads so that you can see how the copper wire was strung. That photo is above this text.

These beads were set on top of the sawdust, and then I put banana peels, scraps from picture frame moldings and shavings on top of them. This whole assortment of wood, sawdust and organic material was lighted with a match and began to burn as the wind whipped around the burning can. The wire wrapped beads will work their way down the fire and end up on the bottom after they have been exposed to all levels and additives of the fire. I will be sure to post these exact beads when the barrel cools off. This won't happen before tomorrow night even though it is very cold out. I expect the fire to burn all night. This sawdust is coarse, left over from the Amish sawmill cuttings, and is slightly damp. It takes longer to burn than the fine sawdust I used a few weeks ago.

Sunday, January 15, 2006


Above is a picture of some beads that were fired either in the pit or in a can with sawdust. The range of grays, blacks and inbetween shades is incredible and is solely the result of the fire and smoke on the beads. I have found that using porcelain clay as a body gives a softer and wider range of colors. These beads were mostly cast from porcelain slip. It gives the bead a creamier quality and I think that the whiteness of the porcelain is more open to trapping the carbon from the smoke than other clay bodies. These beads were bisque fired to cone 06. I am going to try cone 010 as I have read that bisquing at that temperature, which is considerably cooler than 06 will leave the clay body more porous and again trap the carbon better. I will surely post those results but it will be awhile as I haven't bisqued the beads yet, and in fact I haven't even made them. I am still working on a pile that I bisqued at cone 06. And before I forget to mention it, the beads in the above picture are for sale on the Justbeads.com site in the Ceramic category. Currently the Beads of Clay Yahoo Group is putting forth a group effort to put as many artist beads made of clay on the Ceramics categoryas possible. Last I looked we were up to 50. A great chance to see some of the best beads being made by ceramic artists today. You can learn more about this group at http://www.beads-of-clay.org/.

Sunday, January 08, 2006

Pit Firing


Sally Hartman and I did our first pit firing last summer in a great spot by the river that runs through my farm. We used hay, straw. shredded paper, veneer scraps, wood and lots of dead twigs and grass. We had a great time and fell in love with pitfiring. The results were wonderful. Now we have gotten funding by New York State Council on the Arts to do a pitfiring workshop this summer. Our funding conduit is the Canton Public Library. So my plan is to use this blog to record in words and pictures all the sawdust firings and pit firings I do between now and this summer and to show our results from the summer workshop. This should be a sharing of knowledge and hopefully will inspire others to try out this wonderful way of firing clay.
Sally makes weed racks and bowls and I make beads, buttons and pendants. Now Sally is getting interested in jewelry too, as pit fired beads and earrings look so fantastic when set with silver findings and spacer beads.
This first pitfiring lasted 2 full days before it was cool enough for us to dig out our treasures from the ashes. Here is a picture of the pit filled and in full fire:

Raku Bead Video Part III