Sunday, February 23, 2014

A Celebration of Ceramic Clay

'Ceramic Bead Collection' by MarshaNealStudio

Here are a bunch of handmade ceramic beads (Earthenware, Stoneware, Porcelain) that are finished in a variety of ways: all unique to their creator. Want to learn more about ceramic beads:http://www.pinterest.com/loveartjewelry/ceramic-clay-lmaj/


Pendant Maple Leaf Seed Pods...
$27

Lentil Shape Hollow Focal Be...
$45

Petite Crystal Heart Bead Se...
$44.5

Pastel Teal Hearts Ceramic B...
$7

Hand sculpted ceramic bird f...
$7.5

Blossom- handmade aqua and o...
$12

Handmade Ceramic Green Flora...
$6.5

Porcelain Baby Bunny Amber w...
$20

Word Bead: your word, custo...
$8

Handmade porcelain hare Cabo...
$10

Porcelain Oasis Blue Dragonf...
$14.95

Blue Green White Face Barn O...
$8.5

Handmade Porcelain Cabochon
$13

Pink Porcelain Rose Charm
$8

Clouds.... handmade ceramic ...
$14

Ceramic charm pair tree of l...
$10

Sponsored by send bulk email from excel.

Beautiful works of art handmade from ceramic clay which has been fired to high temperatures in a ceramic kiln. Beauties to behold. I am honored to be among them.

Wednesday, February 19, 2014

Bead Table Wednesday

   Free Form Peyote Stitch Bracelet on my bead table this week.

I was happy to learn that Heather Powers is starting up her Bead Table Wednesday posts.  I was part of it when she did it before.  I really enjoyed it and met lots of cool beaders as well.

My bead table has several locations.  This one is in the house.  My others are in my studio which is located in our 1850's renovated barn.
Here I am working on a free form peyote stitch bracelet.  I chose the bead colors before I found this ceramic clay focal in my handmade beads stash.  I made this bead last year out of porcelain ceramic clay which I fired in my kiln to cone 5 which is about 2200 degrees F.  It takes that  much heat to mature (harden and seal)  this mid range porcelain clay.  I love the glassy glossy feel of this focal and the wonderful range of blue colors and how it enhances the seed beads in the bracelet.  Hopefully by next week it will be much further along.  See you then.

You too can participate in Bead Table Wednesday.  Just check out Heather Powers' blog post and see how you can play along.


Friday, February 14, 2014

Saying Goodbye to a Wonderful Online Class:Homesteader's Metalsmithing: Revamped

pieces made during Stephanie Lee's  Homesteader's Metalsmithing: Revamped online class

For the past 4 weeks I have been in soldering heaven with Stephanie Lee's online class Homesteader's Metalsmithing: Revamped.  Tomorrow it will be over.  Sigh.  But wait, the class comes with an ebook of all the videos and written material and the questions we asked during class with our instructor, Stephanie Lee's answers.  So really, I just have to deal with the downtime between the end of the class and the mailing of the ebook.  But, actually an online class is more than just the lessons, it is the sharing of info and pics with the other students in the class.  Although we share on the internet, it feels as if we are all together in the same boat, posting our struggles and triumphs through pics in a Facebook Group. So I will miss that too!!  But guess what I just found out she will be leaving our Facebook Group active indefinitely.  What good news that is!!
New info.  I just learned that the class videos and instruction will continue to be available on the site until the ebooks comes to  us and that new folks can still take the course and will get the videos and everything else!!  So if you are interested in taking this class, registration will continue until the ebook becomes available .  Once the ebook is available that will be the way for new students to take the class.
Today I am sharing my favorite accomplishments from the class as a way of finding closure to a very stimulating and fun time.
The picture at the top of the page is just about everything I made during the 4 weeks of class.  Lots of learning curve pics with mediocre results.  But it's a class so no reason to feel inhibited.  We are all learning together.  That is also part of the fun.  That negative self critic has no grist in this mill.  One of my most favorite pics I did not post because I made it as part of a piece for the Andrew Thornton's  Inspired by  Reading Book Club and that reveal has been postponed until March.
But my next favorite is this one:
                     Lake Erie beach glass:  wrapping found objects that don't have holes

Bezel with one of my ceramic cabochons:  I made a very thin one to try out on this shallow cup bezel ( from Objects and Elements ( the bezel) )

                                       
Copper beads:  I had made these before the class but I tried out the soldering techniques I learned on them.  I like them even more now

          
Several solder techniques:  flooding; stamping; attaching a bail


My favorite stamping that I made during class.  I used African Bronze and Rust Guilders Paste to color it.  It seems to keep on aging.

Soldered link chain, Stephanie Lee style.  I loved making this and plan to do more

This is my own idea using what I learned.  A toggle clasp.  Still have to drill the stringing hole.

Stephanie Lee  thank you so much for such an upbeat and informative class.  I have had your book since it came out 8 years ago, and missed your first Homesteader's Metalsmithing class.  So I am so happy I finally got to participate in your class bringing all these exciting techniques together. You are a superb and very generous teacher!! Your videos are excellent.  Your inspiration: sublime!!!


Thursday, January 16, 2014

Ice Storm Dec. 2013 Pictures

This is what our road looked like at the time of the ice storm. No traffic at all due to the ban on all travel except for emergencies. Below are pictures I took during the ice storm.  

Iced Hay Rake  Below Iced Berries


Iced Small Blue Spruce Trees


Iced Brussel Sprouts

Arch of Ice   Bent over Birch Tree
Iced Maple Tree Branches bent down and touching the ground

Iced Birch Catkins

Iced Maple Leaves

Iced Sunflowers and Netting for Peas


Iced Netting close up


Iced Grape Vines

After 5 days of temperatures above freezing, the  thick coat of ice has finally melted from the roofs.  All of the bent over trees popped back upright as soon as the ice fell over their branches. 

Wednesday, January 08, 2014

Inspired by Reading Book Club Bridge of Birds and Journey to the East Blog Hop

Today is the reveal for the November and December selections for  Andrew Thornton's Inspired by Reading Book Club.  Bridge of Birds by Barry Hughart and Journey to the East by Herman Hesse.
We are doing the two months together due to the two major Holidays that came during that time and our lack of time to fit them in sooner.
I no sooner began to read Bride of Birds than I became quite taken over by the idea of making a necklace focused on the central theme of the book:  a quest to find the Great Root of Power.  I spent quite a bit of time looking into what the ginseng root looks like and than proceeded to build one out of polymer clay.  It enchanted me.  The Great Root took hold of my mind and guided me into making a larger than life necklace of charms that bespeak of  magic, love and the unspeakable!!

Once I made the Great Root (see below)
The Great Ginseng Root by Mary Harding

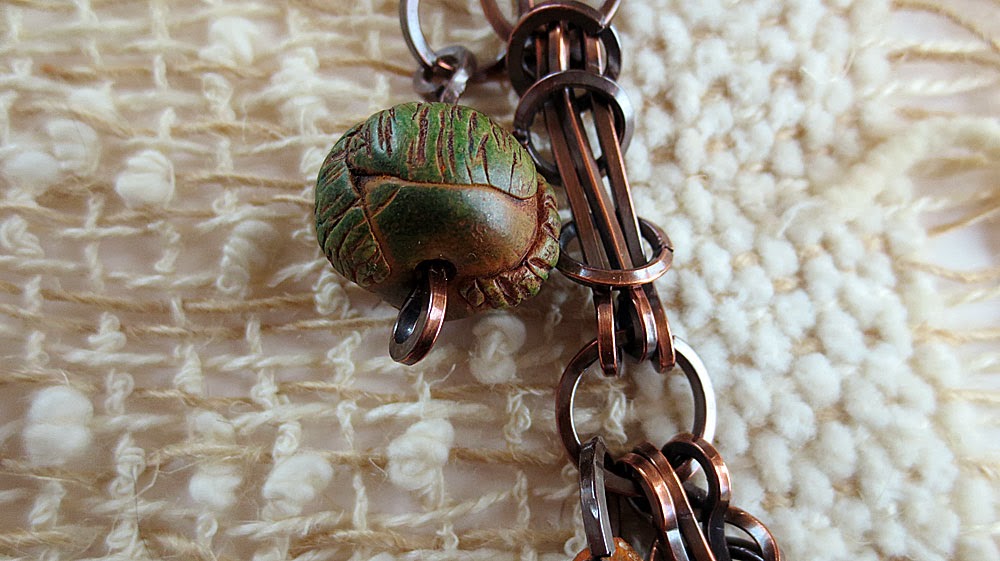
I began on the chain of all chains--from Cindy Wimmer's book The Missing Link.  I spent countless hours bending wire, trying to figure out how to use the stepped pliers and finally tumbling it for half an afternoon  to wash away my many wire working mistakes.  
The chain is magnificent.

chain made from Cindy Wimmer's sliding rings link in her book The Missing Link: part before patina and part with a Liver of Sulfur patina

It was some weeks later that the Great Root lead me to discover the charms I needed to make .

Magnolia bud charm

Love charm

Magical Leaf Charms

Dragonlike charm


Jade Green bead charm

And when I was exhausted from all this creating and making I collected up the Great Root, the magnificent chain and the large polymer charms and put them all together into the
Bridge of Birds Magical Charm Necklace

Bridge of Birds Magical Charm Necklace by Mary Harding

A special thank you to Christine Damm for teaching me how to use polymer clay and for helping me find my inner polymer child.  I am having so much fun!!!  Another special thank you to Andrew Thronton for hosting the Inspired by Reading Book Club and giving  us this forum to display our inspirations and creations.
I hope you will check out what others have made.  Clicking  HERE will take you there.

Tuesday, January 07, 2014

Inspired by Reading Book Club Sneak Peak


The blog hop for Andrew Thornton's Inspired by Reading Book Club  is tomorrow, January 8, 2014.  
Since we are doubling up two months because of the Holidays we have a choice of  books to write about  Bridge of Birds by Barry Hughart and Journey to the East by Herman Hesse.


This picture is of two beads that will be featured in the necklace I am making that has been inspired by Bridge of  Birds.  Both books are rich in imagery so I am sure you will find  lots to read about and look at. I hope you will stop by tomorrow and see what we all made.

Friday, December 20, 2013

Hold Your Fire Cold Connections Boot Camp Blog Hop LMAJ

Close up of  HOPE  Toggle Clasp constructed with cold connections by Mary Harding

Love My Art Jewelry has been doing  a series of Jewelry Boot Camps. The idea is to promote and teach skills for making handmade jewelry with handmade components:  an idea I fully support.  The current Boot Camp  is called  Hold Your Fire which  is about learning how to put metal together without using a torch.  Instead of soldering two pieces of metal together, we learned alternatives that do not require a torch, such  as screw rivets, tube rivets, metal eyelets, escutcheon pins, and nail head rivets. For my project, I used 1/16 inch short and medium brass eyelets that I purchased from Objects and Elements.  They are a bit tricky to use without splitting them, so it is a good idea to used the rounded side on the front of your piece.  I used my center punch and a very light tap with my chasing hammer on the punch and then used the ball  head of my hammer to gently tap around the edges until they curved and formed a tight bond with the metal.  


The toggle bar is also designed with brass eyelets and one of them has a balled head end pin threaded through it and wired wrapped into a loop on the underside.  I like this way of making the loop since it doesn't allow any escape route for the stringing material.


Close up of wrapped wire loop made through the tube of the brass eyelet.  You can also see what an eyelet should not look like when it gets split by heavy hammering,.

You can see what others made by following this LINK and scrolling down to the inlinkz list of participants.  I look forward to the next Boot Camp on Love My Art Jewelry. Thank you to all of you who work so hard to provide us with your wonderful ideas and techniques.

Raku Bead Video Part III